by dofrance | Sep 23, 2015 | Information Technology
Edit /etc/varnish/default.vcl
sub vcl_recv {
  if (req.http.host ~ "^example.com") {
    return (synth (750, ""));
  }
}
sub vcl_synth {
if (resp.status == 750) {
set resp.status = 301;
set resp.http.Location = "http://www.example.com" + req.url;
return(deliver);
}
}

by dofrance | Sep 22, 2015 | Information Technology

One thing that stopped me from taking the plunge and dropping Windows was Photoshop. It’s one of the only programs that has no open source equivalent. I have tried Gimp and all of its plugins but is still no match for Photoshop.
So let me show you how to get Photoshop CS6 working on Ubuntu 14.04.
Downloading Photoshop CS6 Repack
We of course need a copy of Photoshop CS6. There are multiple versions of Photoshop, the one we will be downloading is the “Repack” version. This is a smaller download (309MB) compared to the usual 1GB+ and as far as I know it contains all the same features.
I’m not going to post a direct link to the download but you can search for “Adobe Photoshop CS6 13.1.2 Extended Repack.”
Installing Wine
Wine is a program which allows you to run Windows programs on Linux and Mac. We’re going to install the Wine Team Ubuntu PPA, this ensures the wine version is always up-to-date.
Open up a terminal and run:
sudo add-apt-repository ppa:ubuntu-wine/ppa
sudo apt-get update
sudo apt-get install wine1.7
Installing PlayOnLinux
PlayOnLinux is not needed to run Photoshop but because there is a Photoshop bug in the latest version of Wine we can use PlayOnLinux to easily install a patched version. It works by installing programs in its own virtual drive letting you define which Wine version you want to run the program under and whatever else.
PlayOnLinux also manages a list of patched Wine versions so if a breaking bug is found a patch can be created and easily applied to only a specific program. I usually install each program in its own drive unless it has been given a good rating on WineHQ then it gets installed normally under plain Wine.
Download PlayOnLinux
Download and run the Ubuntu .deb file.
Installing Photoshop
Open up PlayOnLinux. Click on the big “Install” button or Go to File -> Install.
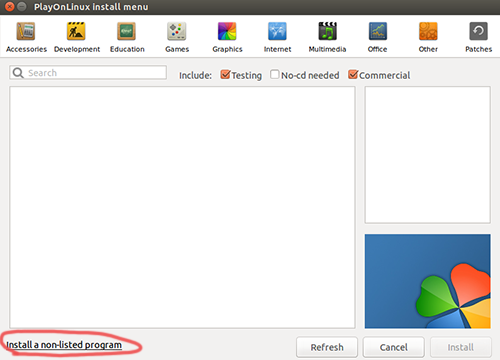
Click on the “Install non-listed program” button.
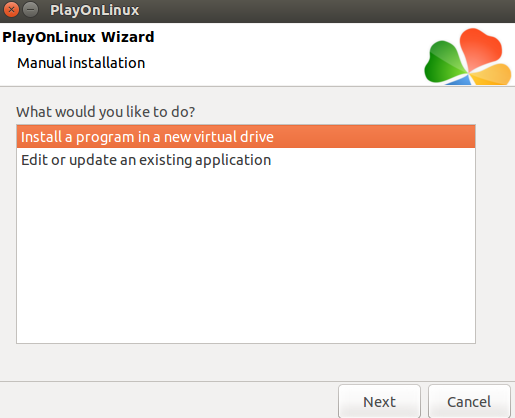
Create a new virtual drive to store the program.
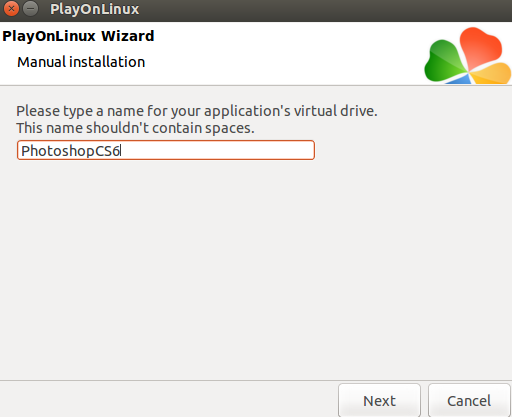
Name it whatever you want.
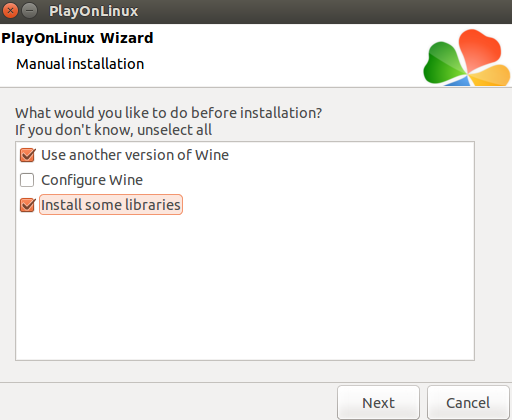
We are going to install a patched version of Wine because there is currently an annoying bug that affects Photoshop and has yet to be fixed. Find more info here.
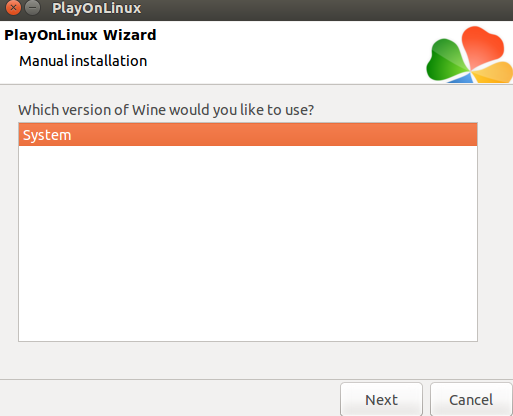
Use the System version of Wine for now.
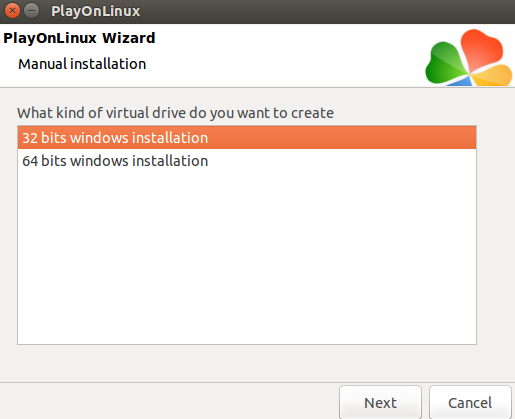
Always use the 32 bit drive version. 64 bit is currently not stable.
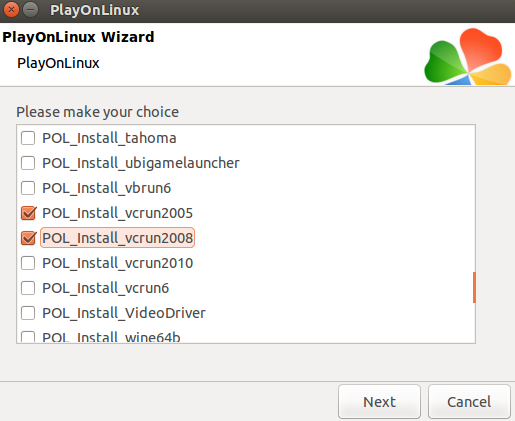
Install these packages:
- atmlib
- gdiplus
- msxml3
- msxml6
- vcrun2005
- vcrun2008
- ie6
- fontsmooth-rgb
- gecko
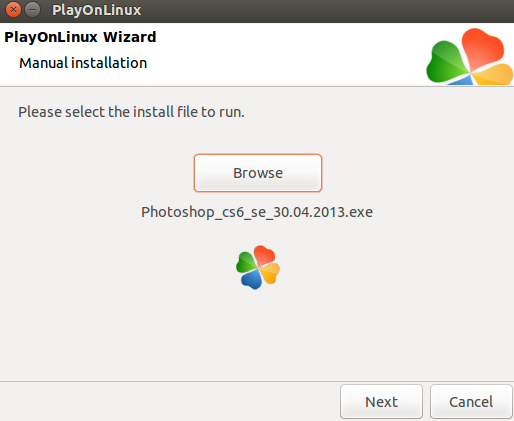
Select the Photoshop.exe and run it. The Photoshop installer will open and continue through the steps.
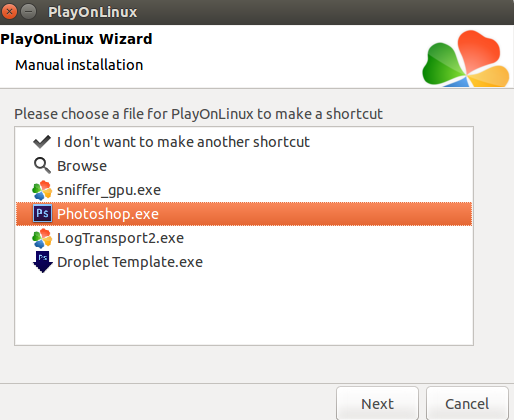
Create an icon on the desktop for the program. After creating it, choose “I don’t want to make an other shortcut” and click next. At this point Photoshop is installed but there is a brush bug which makes the brush sometimes not follow when dragging the mouse. This can be fixed by installing a patched Wine version.
Go back to the main PlayOnLinux window, select the Photoshop program and then click on “Configure”.
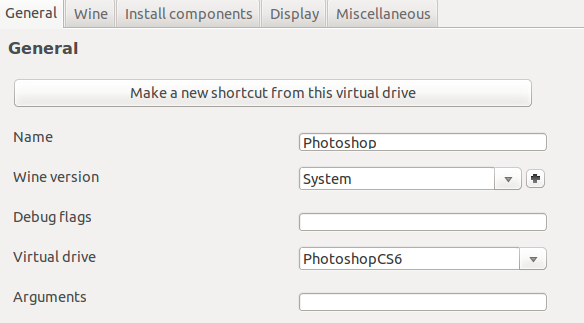
Click on the “+” to install a new version of Wine, then install the “1.7.20-PhotoshopBrushes” Wine version. Then go back and select it from the dropdown.
You are now done. Try opening Photoshop and see if everything works.
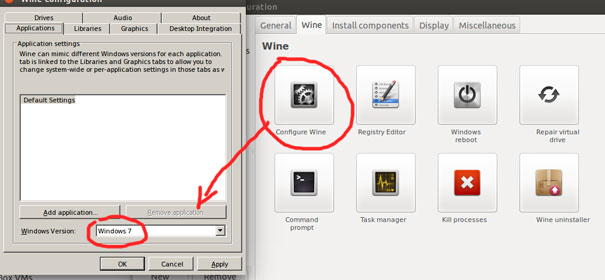
If you get ‘Runtime error’, try changing PlayOnLinux wine configuration to Windows 7.
Note: Tooltips do not disappear, you can disable tooltips in the Preferences -> Interface section in Photoshop.
To fix the Alt key for Photoshop. Open Terminal and run dconf-editor
org -> gnome -> desktop -> wm -> preferences
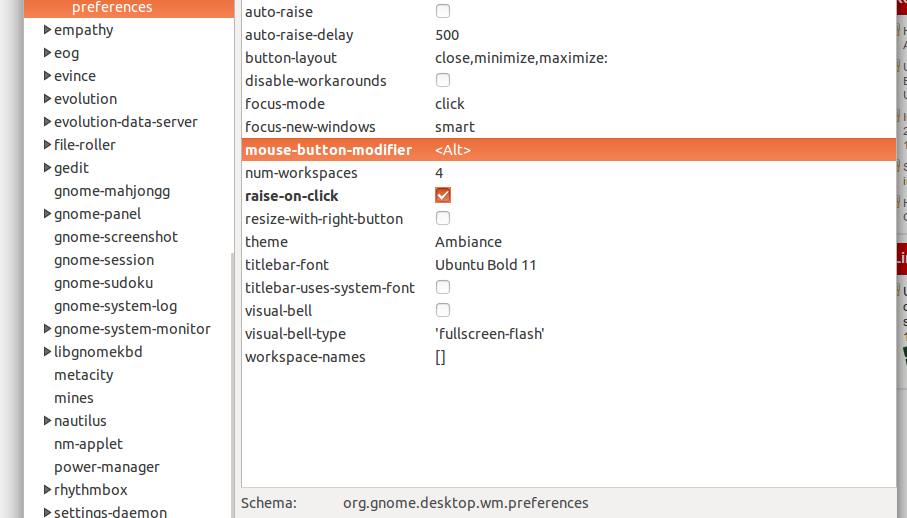
Change all Alt key to Super key
Ref:
http://www.bendangelo.me/install/2014/10/29/installing-photoshop-cs6-on-ubuntu.html
http://www.bendangelo.me/install/2014/10/29/installing-photoshop-cs6-on-ubuntu.html
by dofrance | Aug 28, 2015 | Daily Sysadmin, Information Technology
I have hundred of id file with format like this
106527-Sup, Perman .jpg
106528-Iron, man .jpg
106529-Bat, man .jpg
106530-Spider, man .jpg
I need to rename them to
106527.jpg
106528.jpg
106529.jpg
106530.jpg
use perl-based rename:
rename 's/^(\d+).*jpg$/$1\.jpg/' *.jpg
rename 's/^(\d+).*$/$1.JPG/' *
^ matches the position at the beginning of the input\d+ matches one or more digit.* matches everything in between$ matches the position at the end of the input
The first group ($1) contains the digits you want to replace with.
http://stackoverflow.com/questions/32244473/linux-find-a-match-pattern-and-rename-whole-file-with-that-match
by dofrance | Aug 28, 2015 | Daily Sysadmin, Information Technology
[vc_row][vc_column][vc_column_text]I need to convert 3 DVD contain .WAV file to .MP3. I prefer command line way.
In my Ubuntu 14.04 install FFMPEG
sudo add-apt-repository ppa:kirillshkrogalev/ffmpeg-next
 sudo apt-get update
 sudo apt-get install ffmpeg
Go to the Wav folder and run this command
cd wav/
 for file in *.wav
 do ffmpeg -i "${file}" "${file/%wav/mp3}"
 done
 mkdir mp3dir
 mv *.mp3 mp3dir
Done![/vc_column_text][/vc_column][/vc_row]
by dofrance | May 26, 2015 | Information Technology
This cluster has 2 nodes run in multi master mode
Installing cluster
sudo apt-key adv –recv-keys –keyserver keyserver.ubuntu.com 0xcbcb082a1bb943db
sudo add-apt-repository ‘deb http://mirror3.layerjet.com/mariadb/repo/5.5/ubuntu trusty main’
sudo apt-get update -y ; sudo apt-get install -y galera mariadb-galera-server rsync
Configuring cluster
On each of the host in the cluster add this configuration
vi /etc/mysql/conf.d/galera.cnf
[mysqld]
#mysql settings
binlog_format=ROW
default-storage-engine=innodb
innodb_autoinc_lock_mode=2
query_cache_size=0
query_cache_type=0
bind-address=0.0.0.0
#galera settings
wsrep_provider=/usr/lib/galera/libgalera_smm.so
wsrep_cluster_name=”my_wsrep_cluster”
wsrep_cluster_address=”gcomm://192.20.3.31,192.20.3.32″
wsrep_sst_method=rsync
Stop MariaDB instance in all of the Galera hosts
sudo service mysql stop
Init the Galera cluster on my 1st node by start MariaDB
sudo service mysql start –wsrep-new-cluster
Just start MariaDB on my 2nd node
sudo service mysql start
To prevent startup error on 2nd node we need to copy /etc/mysql/debian.cnf content from node1 to node2 and then restart MariaDB on 2nd node
Confirm cluster status has started
mysql -u root -p -e ‘SELECT VARIABLE_VALUE as “cluster size” FROM INFORMATION_SCHEMA.GLOBAL_STATUS WHERE VARIABLE_NAME=”wsrep_cluster_size”‘
Enter password:
+————–+
| cluster size |
+————–+
| 2 |
+————–+
From now on the data will sync between both hosts. To test it try create one database from 1st node then go to 2nd node and see it is there.
On 1st node
mysql -u root -p
create database HelloWorld;
On 2nd node
mysql -u root -p
show databases;
if Helloworld database was there. That’s kool. We’re ready to go.
Grant Remote privilege to remote user on DBcluster
On one of the DB host (node1 or node2)
mysql -u root -p
create user ‘handsome’@’%’ identified by handsome_password;
grant all privileges on Database_name . * to ‘handsome’@’%’;
flush privileges;
show grants for ‘handsome’@’%’;
Note:
Replace handsome with your username or root
Replace Database_name with your DB name or * to grant privileges on all Database
DNS setting
On my premise DNS server I add a Round Robin DNS record point to 2 Galera host
dbcluster -> 192.20.3.31
dbcluster -> 192.20.3.32
On my PHP app server I can connect to the dbcluster with this command
mysql -u root -p -h dbcluster
If it not work, you could have a look on MariaDB log
Reference link:
https://www.linode.com/docs/databases/mariadb/clustering-with-mariadb-and-galera
by dofrance | May 21, 2015 | Information Technology
Here’s my setup: Client -> Varnish cache -> 2 x Worpdress -> Memcached -> 2 x MariaDB
I need to sync WordPress folder on both Machine, just have a look on NFS, CEPH, GlusterFS and I go with GlusterFS
sudo apt-get -y install glusterfs-server
If you don’t have a on premise DNS server, we can add the server name in to hosts files
192.20.1.1 srvr-phpnode1.mydomain.vn srvr-phpnode1
192.20.1.2 srvr-phpnode2.mydomain.vn srvr-phpnode2
Create a directory for Gluster Volume on both hosts
mkdir /gluster-volume
Check for other peer status
sudo gluster peer probe srvr-phpnode2
peer probe: success
sudo gluster peer status
Number of Peers: 1
Hostname: srvr-phpnode2
Port: 24007
Uuid: 225698cb-a84f-4b5b-8537-27732d752aba
State: Peer in Cluster (Connected)
Glusterfs distributed vs Replica mode (GlusterFS docs):
Distributed mean data distributes across the available bricks in a volume: write 100 files, on average, 50 on one server, and 50 on another. This is faster than a “replicated” volume, but isn’t as popular since it doesn’t give you two of the most sought after features of Gluster — multiple copies of the data, and automatic failover if something goes wrong
Create wwwVol volume on host srvr-phpnode1
sudo gluster volume create wwwVol replica 2 transport tcp srvr-phpnode1:/gluster-volume srvr-phpnode2:/gluster-volume force
(GlusterFS docs): we tell it to make the volume a replica volume, and to keep a copy of the data on at least 2 bricks at any given time. Since we only have two bricks total, this means each server will house a copy of the data. Lastly, we specify which nodes to use, and which bricks on those nodes. The order here is important when you have more bricks
sudo gluster volume start wwwVol
sudo gluster volume info
Volume Name: wwwVol
Type: Replicate
Volume ID: 8c1430d4-8b25-4967-9a46-39287cdedbb2
Status: Started
Number of Bricks: 1 x 2 = 2
Transport-type: tcp
Bricks:
Brick1: srvr-phpnode1:/gluster-volume
Brick2: srvr-phpnode2:/gluster-volume
We need /var/www will be on GlusterFS so we will mount wwwVol to /var/www on both hosts
On both hosts
mkdir /var/www
On phpnode1
vi /etc/fstab
srvr-phpnode1:/wwwVol /var/www glusterfs defaults,_netdev 0 0
mount -a
On phpnode2
vi /etc/fstab
srvr-phpnode2:/wwwVol /var/www glusterfs defaults,_netdev 0 0
mount -a
Other GlusterFS command
gluster volume stop VOLNAME
gluster volume delete VOLNAME
gluster volume remove-brick VOLNAME wnode1:/www
http://www.gluster.org/community/documentation/index.php/Gluster_3.1:_Deleting_Volumes
http://www.gluster.org/community/documentation/index.php/Basic_Gluster_Troubleshooting


