by dofrance | May 28, 2014 | Uncategorized
Watts, amps, volts, and ohms; what does it all mean? You don’t have to be an electrician to understand these terms. Electrical readings often mirror that of a simple comparison to your garden hose. How is that? Like a garden hose, electrical wiring has something running through it but instead, the substance is electricity instead of water.
Understanding basic electrical readings will help you comprehend how much heating capacity your electric fireplace will actually provide. Each of these readings is directly related to heating capacity.
Editors Note: You can skip down to the bottom if you want sift through the technical jargon for a simple answer.
Basic Electric Formulas
Here are the Basic Electric Formulas.
Watts
Watts means power. An easy way to understand wattage is by plugging your finger into the end of a garden hose. You didn’t increase the amount of water flowing through the hose so why then, would the water flow at a higher rate and have a higher force? Since you reduced the size of the hole (gauge of the electrical wire), you increased the pressure (or voltage). This action propagates the substance at higher rates.
An increase in power is attributed to an increase in wattage. You’ll often see this reading on stereo systems, fans, microwaves, and just about anything that uses electricity. Watts are a measurement of electrical power (P). Power is equivalent to voltage times current. For the mathematicians out there: P = V x I
Current is a quantity that measures the volume of electrical flow between two pointsand is measured using amperage. Current is measured in amperage or “amps” for short.Amps measure the amount of electricity being used. Referring back to the garden hose analogy, amperage would be akin to the number of gallons of water was pumped through the water spout.
Current is abbreviated with the letter “I” not to be confused with “L.” Current is calculated using the formula created by Ohm’s Law: I = V/r. This can be read, “current is equal to voltage divided by resistance.”
Volts
Using our garden hose analogy, the voltage of electricity is akin to the pressure in a garden hose. Imagine a 1 inch hose with a little bit of water flowing through it. Twist the faucet open and you have a stream of water that creates pressure inside the hose. Similarly, the voltage of an electrical wire is determined by factors such as the size of the wire (gauge) and resistance (covered in the next section). Simply put, voltage tells you how much force is being exerted relevant to the wire.
A voltage meter or voltmeter is an instrument used for measuring electrical potential difference between two points in an electric circuit.
Voltage is important because an overload (sending too much power through an undersized wire) can lead to blown fuses and tripped fuse panels. This is one of the trouble spots that can cause
electric fireplaces to fail. Voltage is an actual measurement. Voltage is equal to current times resistance.
V = I x r
Ohm’s ?
Watts, amps, and voltage all culminate into Ohm’s, a measure of resistance.
Ohm’s Lawuses these 3 mathematical equations to demonstrate the relationship between electric voltage, current, and resistance.
Resistance is measured in Ohm’s using the formula
R = V/I. This is read as Resistance = Voltage divided by Current. Ohm’s law states that the current through a conductor between two points is directly proportional to the potential difference across the two points.
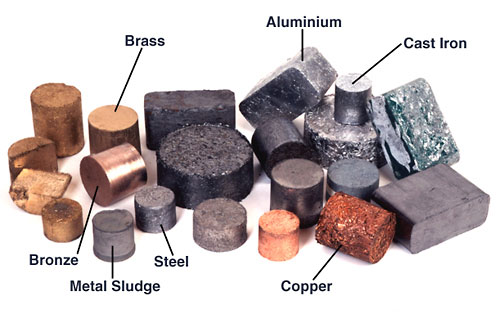
This is important because different types of metal carry different types of resistance because of their inherent physical properties. For this reason, certain metals prove to be better conductors and transmit electricity easily.
Here you can see the inside of different types of metal. Silver offers the least resistance but copper is a close second and is the most popular choice. Source: ntd-ed.org
Generally speaking,
silver is the least resistive metal however, it has a high density. For this reason, most wiring uses copper or gold which has a lower density-resistivity level. If you’re really bored, you can check out tis table for a
full list of resistivity of different types of metals.
Simplified Version for those Who are too Lazy to Read or Want the Short Answer
- Amps measure the amount of electricity being used.
- Voltage measure the pressure (or force) of electricity.
- Wattage is a measure of electrical power.
- Ohm’s measures the resistance between two points. The thicker the gauge of wire is, the more electrical current flow through from point A to point B.
Applying it in Real Life
So how does all of this translate into the warm air coming from your electric fireplace? Electricity is used to generate heat from an electric unit.
The amount of electricity that can flow through your electric fireplace is directly relevant to BTU output. BTU is an abbreviation for
British Thermal Units and is used to measure heat and cooling output for heaters and air conditioning units. Check out this post to
learn how BTU’s work. Likewise, you can use this BTU calculator to
determine how many BTU’s your home needs.
When it comes to electric fireplaces, the saying holds true;
looks don’t mean everything. It’s important to understand how electric readings translate to heating efficiency. You can find details and specifications on all of the latest models from top brands like
Dimplex,
Holly & Martin, and
Real Flame right here on
Portable Fireplace.com.
by dofrance | May 27, 2014 | Information Technology
http://wpengine.com/support/how-does-all-this-work-https-ssl-certificates-ca-public-and-private-keys-csrs/
HTTPS, SSL, certificates, and all the other bits and pieces of browser security is complicated, and it’s hard to get a simple, clear explanation of what it means and what to do. Hopefully this will help.
CAVEAT
This description intentionally omits various details and exceptions. The purpose is to give a non-technical user a clear picture of how all this stuff works. Extra complexity would just cloud this clarity. Use references like Wikipedia and security books for completely precise information.
HTTPS AND SSL
SSL stands for Secure Socket Layer, and it’s a protocol that does two things:
- Encrypts your data, which means no hacker can see what your browser sends to the server nor what the server sends to the browser.
- Authenticates your website, which means it tells your browser “This website really is who it claims to be.” For example, that when you type your username and password into your PayPal account, that the website really is PayPal, and not a hacker posing as PayPal.
HTTPS just means “HTTP with SSL.” Just as “http://” means “this is a website,” seeing “https://” means “this is a website, and it’s using SSL to encrypt data and authenticate the website.
So when you want a “secure website,” i.e. a website with https, you’re saying you want us to support the SSL protocol. It turns out the encryption part of that protocol we can handle completely automatically for you, but the authentication part is a lot trickier. So the rest of this will be about authentication.
CERTIFICATES
A Certificate is a document that your website shows a browser to proclaim its identity. It “certifies” that the website is who it says it is.
It includes web-stuff like your domain name (e.g. “paypal.com”) and also identification-stuff like your company’s name, address, phone number, and so forth. Some certificates provide more information than others, but this is the general idea.
Simple enough, but the trouble is it’s not authentication. Because: Although PayPal provides a certificate identifying themselves as PayPal, a hacker could just as easily provide that same certificate to the web browser! How does the browser know that this certificate is to be trusted?
CA stands for “Certificate Authority,” and it’s a company who will verify for the browser that a particular website’s certificate can in fact be trusted. All browsers come pre-loaded with special security files listing dozens of CAs whose opinion it will trust.
So it’s not enough that your website provides a certificate, it needs to be a certificate that has been certified by a CA. This is called a Signed Certificate, because the CA has “signed their name” to your certificate so that the browser will trust it.
To get a signed certificate you first need to select a CA. There are literally dozens of CAs; some examples you might have heard of are GoDaddy, Verisign, but if you search on Google you’ll find a zillion of them. Prices range from $50 to $5000 depending on lots of factors. You’ll need to consult with your CA or a technical consultant to decide what’s right for you since there’s lots of details and trade-offs.
Next you’ll need to generate other documents which you provide to the CA in order for them to process and issue your precious signed certificate. I know, like Alice and Wonderland you’re going further down the rabbit hole…
PUBLIC AND PRIVATE KEYS
A Private Key is a secret password that your website keeps and which you never ever ever let anyone have access to except your hosting company and your CA. Unlike your email password, this password is really long, typically 1024 characters or more. That’s a good thing — a human being never needs to read it, only machines, so it’s good to have something so massive that it really is literally impossible for anyone to guess it.
The private key is a required component of SSL because it’s part of how it does the encryption part of its job. It’s also a required component of the certificate and the CA’s approval, because what you’re really saying is this:
“This secret, private key XYZ is something that only me, the real website, knows. So I want you, the CA, to verify to him, the browser, that this certificate (my identity) is one and the same with this private key. So then when I use that private key to send encrypted stuff to the browser, the browser will be certain I’m who I say I am, and we’re in business.”
But wait — if you use the private key to encrypt data, doesn’t that mean the browser needs that same private key to decrypt the data? And then the private key isn’t a secret anymore! Don’t worry, that’s not how it works. It’s like this:
When your security tool creates one of these special private keys it also creates a corresponding, matching Public Key. This is a different password, but also really long, like 1024 characters. The public and private keys are a pair with the following very useful feature:
Data encrypted with the private key can only be decrypted with the public key. (And vice versa.)
So here’s how this all gets put together:
Your website keeps the private key secret, and encrypts everything with that key. The public key is placed inside that certificate as yet another part of your website’s identity, just like your domain name and phone number. When the CA certifies your certificate, it’s telling the browser, “Yes this is the real-life identity of this website, and furthermore that’s the public key of this website, so you can trust anything that you can decrypt with that public key.”
Since only the private key can encrypt stuff for that particular public key, only you, the real website could be talking to that browser, providing that certificate, and that’s how the browser knows you’re actually you.
It’s also why you need to keep that private key secret. It’s also why you will need to give that private key to us, your hosting provider, because we’ll need it to encrypt data coming from your website.
Now there’s only one more thing you’ll need to get this friggin’ certificate certified by the friggin’ CA:
CSR stands for Certificate Signing Request, and it’s the official document you give to a CA asking them to “sign” your certificate, thus finally getting you that “signed certificate.”
The CSR essentially just combined all the stuff we just discussed — the public key, the certificate you want signed, etc — in a standard format. There are security tools which generate CSRs depending on what fields you need to fill out and using your keys.
It’s a common mistake to think the CSR is the same thing as a signed certificate, but as you can see that’s not at all the case. The CSR is literally a request, not a signed certificate. Only a CA can provide you with a signed certificate.
GETTING IT ALL LIVE AND WORKING
To host your HTTPS-powered website, we’ll need two things:
- Your private key (so we can encrypt data)
- Your signed certificate (so we can provide that to browsers)
We don’t need your public key, CSR, or any other things you might have generated along the way.
You can purchase and configure an SSL Certificate in the User Portal by following
this guide.
Please note, we only offer SSL on our Professional and above Plans.
CHAINED CERTIFICATES (NEEDED ONLY SOMETIMES)
About 10% of the time your CA will require you to use something called a Chained Certificate. If that’s not the case for you, you can skip this section.
Here’s why this happens: Remember the web browser has a list of CAs which the web browser trusts. Now suppose you used a CA which was not in that list. The browser won’t accept your certificate because, although it’s signed, it’s signed by a CA which in turn the browser has no reason to trust! This unknown CA could just as easily be a hacker.
To get around this, your CA will provide you with another certificate that says “I’m a CA you should trust, and look, I got this other CA to certify that I’m a trustable CA, and you do already trust that CA.”
In short, your CA passes the buck to a trusted CA, therefore creating a “trust chain.” The browser trusts your website because your CA says so, and it trusts your CA because another CA says so, etc., until we get to a CA the browser trusts implicitly because it’s in that “official list of trusted CAs.”
If this is the case for you, that’s fine! We just need you to send us that additional certificate so we can provide the complete chain to the browser. Your CA will be able to give you that document.
DEDICATED IP’s
You can only have a dedicated IP provisioned for your site if you have an SSL certificate. You have to have the SSL certificate first before we make the request to get the dedicated IP for your site.
by dofrance | May 27, 2014 | Information Technology
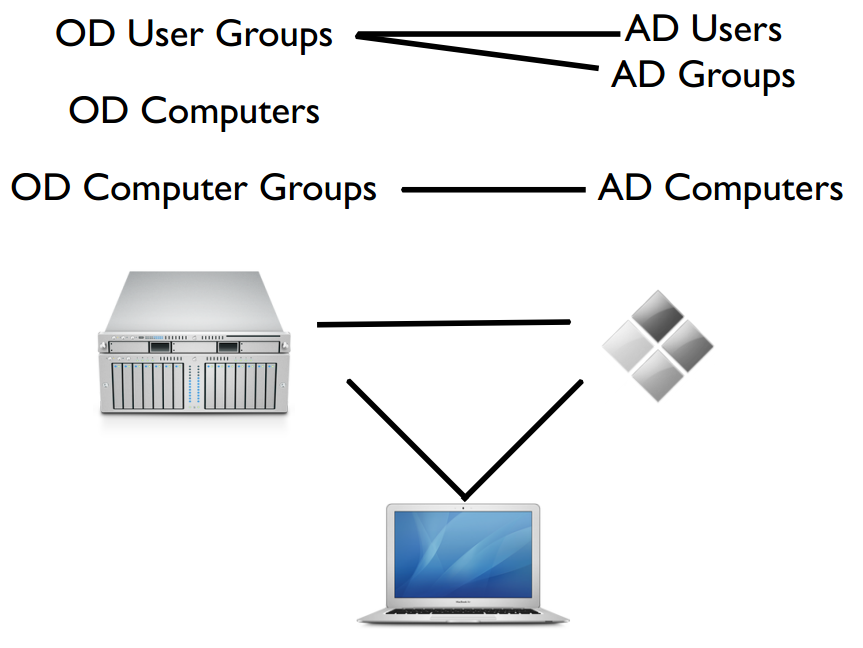
I drove myself crazy reading a lot of people set up their Triangles called Dual Directory, Golden Triangle, Magic Triangle… But you will clearly understand how it all work with this image below from MacSysadmin Magazine.
Clients still use Active Directory for user authentication, while Open Directory supplies Managed Preferences only.
Every Profile Manager instance is an Open Directory Master. Apple has included a local group in Mac OS X Server called Profile Manager ACL. Users and groups from any directory domain that can be viewed in dscl can be added to this group. Adding objects to this group enables them to authenticate to the MyDevices portal but not administrate. Kerberos isn’t really used here, nor are nested groups. You’ll apply policies directly to Active Directory groups in Profile Manager.
Start by enabling directory services debug logging:
odutil set log debug
disable the debug logging:
odutil set log default
Now when you attempt to join Active Directory, you can look at the log at /var/log/opendirectoryd.log to see what’s occurring.
To disable encryption:
/usr/sbin/dsconfigad -packetencrypt disable
To reenable encryption:
/usr/sbin/dsconfigad -packetencrypt allow
When capturing traffic for the following ports:
UDP 53 – DNS
TCP 88 – Kerberos
TCP 389 – LDAP
TCP/UDP 464 – Kerberos Password Changes (KPasswd)
TCP 3268 – Global Catalog (LDAP)
To capture traffic over the built-in Ethernet connection to a file called “capture.out,” you could use the following syntax for tcpdump
tcpdump –K -i en0 -s 0 -w capture.out port 88 or port 464 or port 53 or port 389 or port 3268
Setting Up Profile Manager
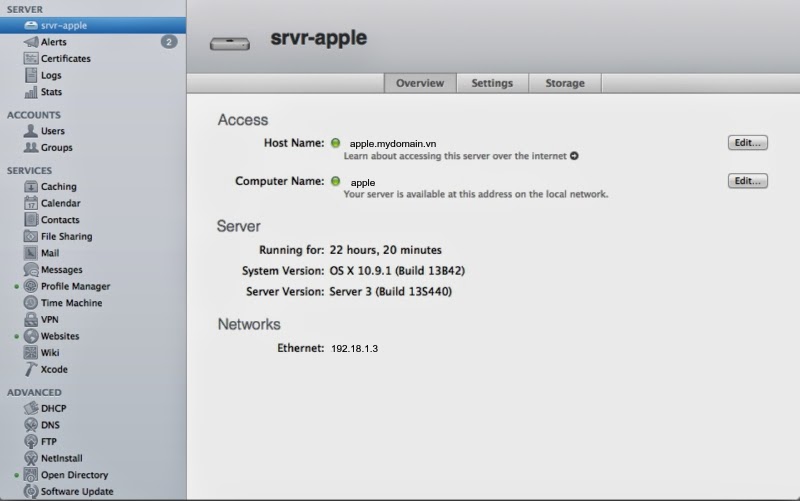
Prepare: HostName, ComputerName, LocalHostName, Static IP, DNS: A, PTR record
apple.mydomain.vn – 192.18.1.3. Go to Server app
Profile Manager is built on top the web service, APNS and Open Directory
Start the web service (click ON slider) and View Server Website
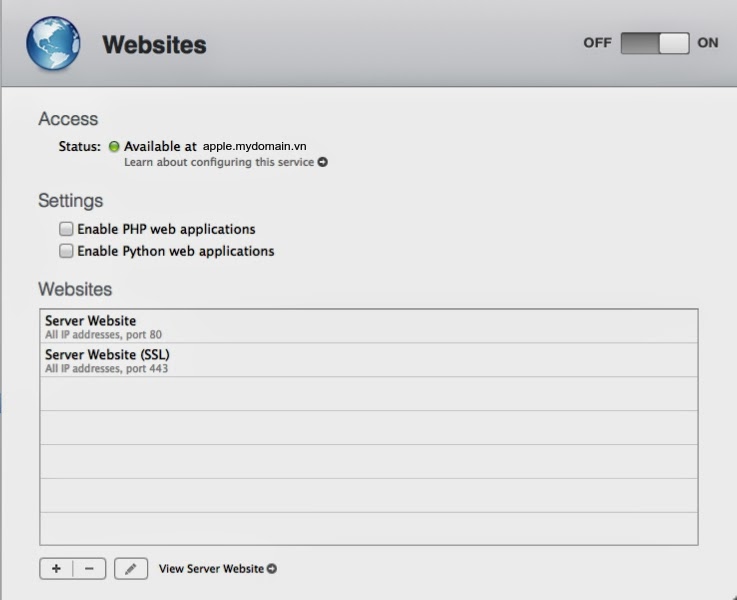

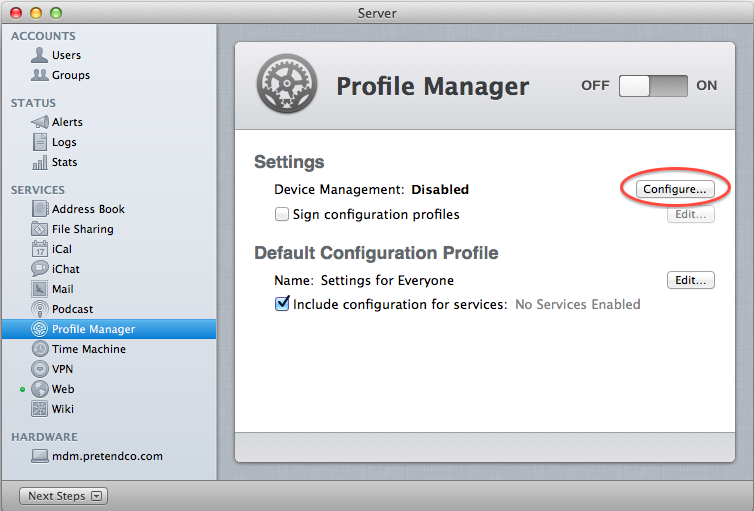
Click on Profile manager service (DO NOT CLICK ON ON/OFF SLIDER)

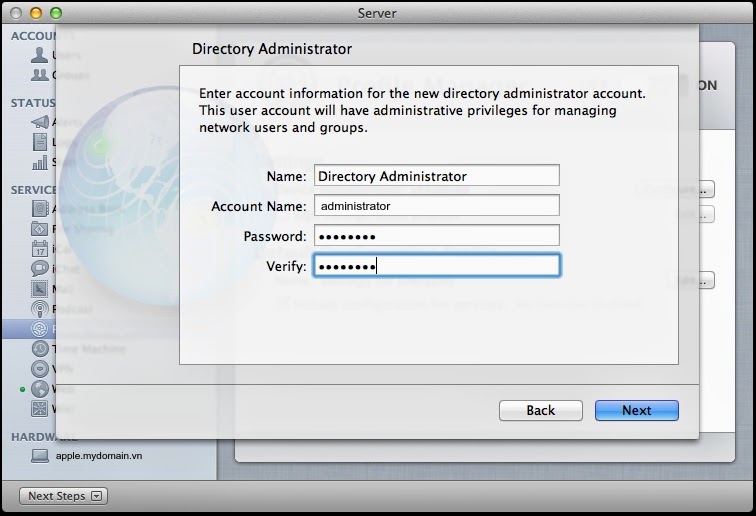
At the Directory Administrator screen, provide the username and password you’d like the Open Directory administrative account to have (note, this is going to be an Open Directory Master

Account Name: administrator
Pass: yourp@ss
The Open Directory master is then created. Even if you’re tying this thing into something like Active Directory, this is going to be a necessary step. Once Open Directory is setup you will be prompted to provide an SSL Certificate.
This can be the certificate provided when Open Directory is initially configured, which is self-signed, or you can select a certificate that you have installed using a CSR from a 3rd party provider.
You will then be prompted to enter the credentials for an Apple Push Notification Service (APNS) certificate. This can be any valid AppleID.
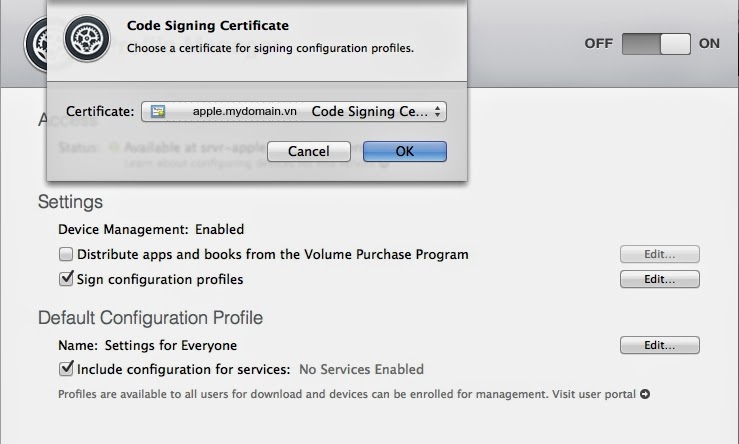
When the assistant closes, you will be back at the Profile Manager screen in the Server application. Here, check the box for Sign Configuration Profiles
=> Import mydomain.vn certificate

Finally Click ON to start Profile Manager -> http://apple.mydomain.vn/profilemanager/
Login with adminitrator yourp@ss
Integrating Mac OS X Lion Server’s Profile Manager With Active Directory
Bind to Active Directory
System Preferences, click on the Users & Groups System Preference pane and click on Login Options. Then click on the Edit… button for the Network Account Server. From here, click on the plus sign (“+”) and enter the domain name into the Server field.
Once bound, you will see the server listed. At this point, if you try to authenticate to the MyDevices portal as an Active Directory user, you will be able to authenticate, but you will not have permission to enroll devices. To log in, access the web service at the address of the server followed by /MyDevices https://apple.mydomain.vn/mydevices.Provide the user name and password to the service. The Active Directory users are unable to access the MyDevices service. Nest Groups Using Workgroup Manager
Click on Logout and we’ll fix this. There is no further configuration required for the Active Directory groups to function properly in regards to how they work with the server. However, we will need to open Workgroup Manager and nest some groups. You might think that you’d be doing something all kinds of complicated, but notsomuch. You also might think that you would be nesting the Active Directory users and groups inside Open Directory groups, given that you have to enable Open Directory in order to use Profile Manager. Again, notsomuch. To nest the groups, browse to the local directory and then then click on the com.apple.access_devicemanagement group.
Click on the lock icon to unlock the directory domain, authenticating when prompted.
Click on the Members tab and then click on the plus sign (“+”) to add members to the group. Workgroup manager -> View -> Show system record
Then in the menu that slid out, click on the domain browser at the top of that menu and select the Active Directory entry.

Test Access
Drag the user or group from the menu into the list of members and then click on the Save button.
Now log in again using the MyDevices portal and you’ll be able to Enroll. From within Profile Manager (log in here as a local administrator), you’ll see all of the users and groups and be able to apply policies directly to them by clicking on the Edit button for each (the information isn’t saved in the directory service on the server, but is cached into the directory service client on the client when using Mac OS X 10.7, Lion based clients).
To enroll devices for management, use the URL -> https://apple.mydomain.vn/mydevices/
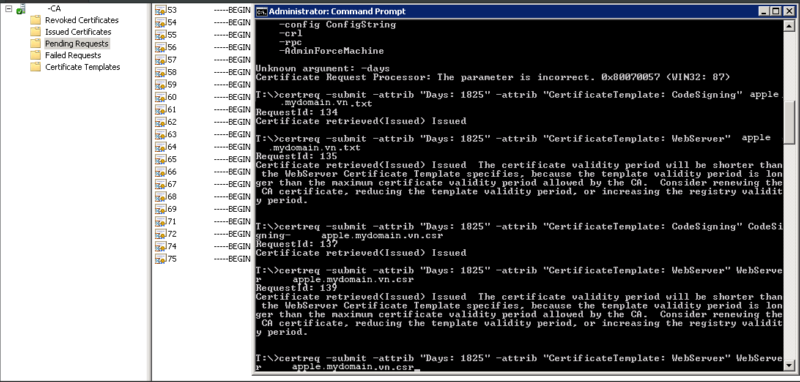
To Sign Certificate -> Create a CSR from Certificate Management from Server.app, then open Certificate Authority on Windows Server 2008 create a Code Signing from Certificate Template -> use command line to sign the CSR file

Reference:
http://krypted.com/iphone/setting-up-profile-manager-in-lion-server/
http://krypted.com/mac-security/integrating-mac-os-x-lion-servers-profile-manager-with-active-directory/


